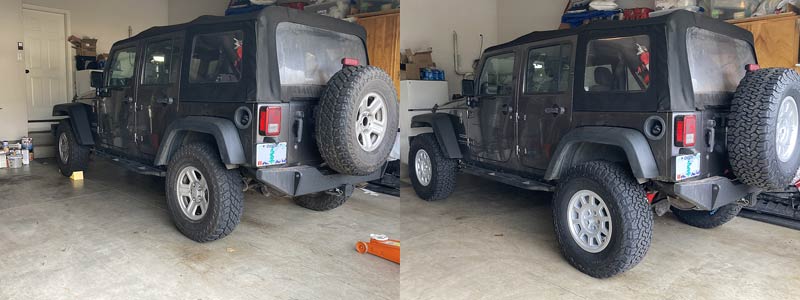
When it came to lifting my Jeep JK I was not sure what to expect. Is this something that I could do in my garage, by myself? Did I have all of the right tools? Did I have all of the right parts that I needed? These are some of the questions that were rolling around in my mind, as I wheeled the floor jack under the rear differential and began what turned out to be a fairly straight-forward process of installing new springs, shocks, brake lines, lower control arms, and a myriad of small pieces that supported the lift.
There are a lot of lift “kits” on the market that purport to include everything that you need to lift your Jeep. That may or may not be true, but I opted to assemble my own kit of parts to meet my specific needs. As an example, I used Old Man Emu 2616 springs in the front, which are considered “light weight” for a JK Unlimited but support an additional 90lbs. over the factory springs. This is just right for the winch on my factory bumper, with a bit of room left over.
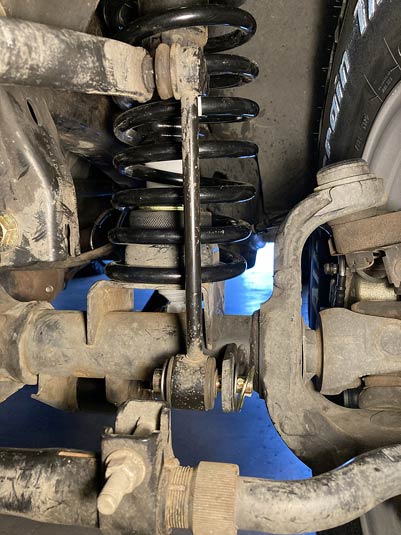
In the back, I used Old Man Emu 2618 springs. These are considered “medium” for a JK Unlimited and support an additional 300lbs over the factory springs. This is a good match for the 250lbs Ursa Minor top that is about to be installed on my Jeep. Without the additional weight, these springs lift the Jeep 3 ½ inches – a full inch over the lighter front springs. The springs are the most important component of the lift, and I have not seen any prepackaged lift kits that accommodates this kind of tuning.
Tools
A floor jack and a good set of heavy duty jack stands are a must. If you are doing this by yourself, I found that a bottle jack is also very useful, for tilting one end of the axle to get a bit more clearance when installing a coil spring. From a hand tool standpoint, most of this work was performed with 1/2-inch drive sockets and corresponding combination wrenches. There are a few 10mm bolts where a 3/8-inch drive can be used. The brakes will require small combination wrenches for the brake line fittings, banjo nut, and bleeder valve. The disassembly requires a ½-inch breaker bar, and reassembly requires a ½-inch torque wrench. The track bars and lower control arms are all 125 ft. lbs. and the upper control arms are 75 ft. lbs.
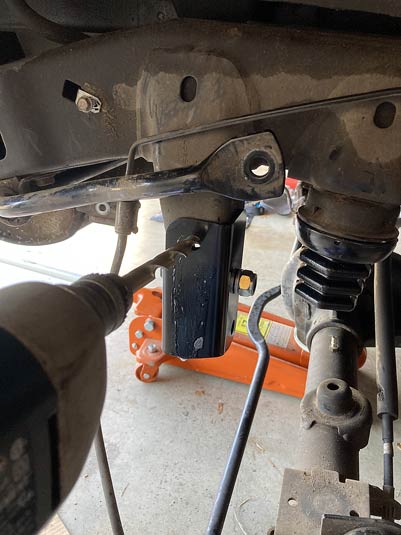
Other tools that you might need really depend on the aftermarket products that you intend to install. For instance, these MetalCloak DuroSpring bump stops (which are awesome!) get pressed into place with a full size crowbar. The factory bump stops are easily removed with a pair of channellocks.
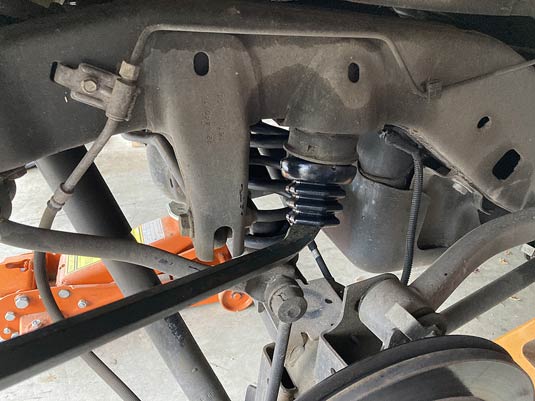
A rear track bar drop-bracket is recommended even if using an adjustable panhard bar, because it keeps the roll center of the Jeep in roughly the same place (assuming a 2-3 inch lift). This bracket will require a ½ inch hole be drilled into the frame. With the OME 2618 springs, my rear axle is ¼” strong to the passenger side with this bracket. This will come back in once the Ursa Minor top is on, but if your plans are to run with 3 ½ inches of lift, an adjustable panhard bar will be needed to center the rear axle.
Aftermarket lower front bump stops, which are generally considered superior to extending the factory upper bump stops, will also require drilling. Also needed is a hacksaw for cutting-down the rear sway bar link bolts so that they do not interfere with the brake hard lines. Clearance between the rear sway bar, the wheels, and the frame are very tight.
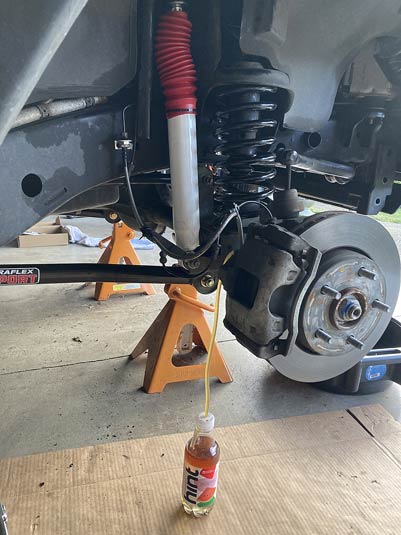
Finally, if you are doing this yourself, you will need a method of bleeding the brakes (assuming you installed new brake lines – which you definitely should in the front). I used a juice bottle and some ¼-inch tubing, which fits snugly over the bleeder valve. Make sure the tubing is fully immersed in fresh brake fluid, pump the brakes a few times, or until bubbles in the tubing disappear, and you are all set! Be sure to top-off the brake fluid reservoir under the hood, after bleeding each side.
Components
For my suspension lift, I used components from about nine different manufacturers. The final tally for this build was $1,434.76 which seems more than competitive with a lot of the lift kits that I have looked at.
Rear Springs: Old Man Emu
Rear Shocks: Rancho
Rear Bump Stops: MetalCloak
Rear Panhard Bar Drop Bracket: Old Man Emu
Rear Brake Line Drop Brackets: JKS Manufacturing
Rear Sway Bar Links: Steinjager
Front Springs: Old Man Emu
Front Shocks: Rancho
Front Bump Stops: MetalCloak
Front Adjustable Track Bar: DV8 Offroad
Front Braided Stainless Steel Brake Lines: Mammoth Offroad
Front Brake Line Anchor Brackets: Teraflex
Front Lower Control Arms: Teraflex
Front Sway Bar Quick Disconnect Pins (for Rear Sway Bar Links, moved to the front): Ohio Diesel Parts
General Observations
Were I to do this again, I would drop the brake line brackets altogether and just go with braided brake hoses all the way around. At around $50 a pair, it is just a lot cleaner look than the brackets. I will likely lose the rear brackets and go with new hoses at my next oil change, which will also give me a good opportunity to flush my entire brake system.
The factory rear sway bar links are the ideal length for the front, at least with a 2 ½ inch lift. Add in a $23.50 set of quick disconnect pins from Ohio Diesel Parts, and you basically have the equivalent of a $100+ set of quick disconnect sway bar links.

I can’t say enough good things about the DV8 Offroad front track bar. It works just like the drag link, with a double-threaded sleeve that allows you to easily center the axle without having to first disconnect the track bar.
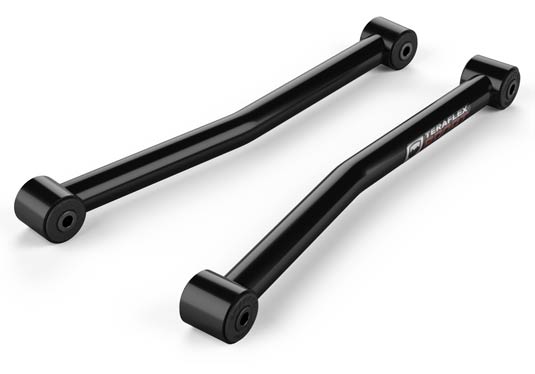
I would not want to attempt replacing the front upper control arms on my own, but replacing the lower arms with these Teraflex Sport arms was a breeze. One fallout from lifting the Jeep JK is that the axle assembly moves rearward as you go up in height. This reduces caster, which impacts steering stability and can cause the jeep to “wander.” The Teraflex arms are slightly longer than stock, which corrects the caster angle for 2 ½” to 3″ lifts.
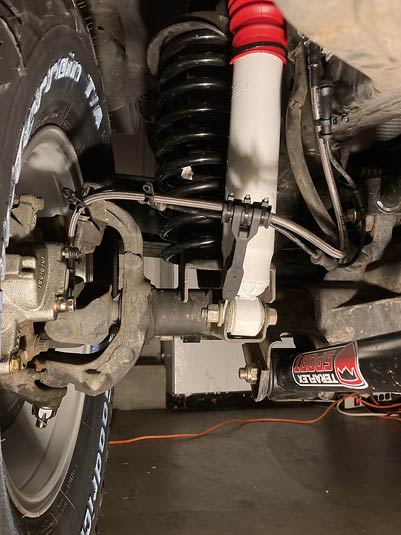
The challenge of routing braided front brake lines is that you have to account for both the suspension travel and maximum steering lock. These Teraflex Brake Line Anchors (attached to the shock absorber bolt) hold both the ABS and brake lines at just the right spot to keep everything clean and prevent binding or contact with other parts. Well worth the $20!
I hope that you found this article useful! If you have any questions, feel free to contact me.